Open top menu
31 Oct 2013
Happy Halloween 2013!

Today is Halloween and I wish everyone lots of spooky surprises with this self-made card using photographs of silhouette and glow-in-the-dark objects. The card is produced using photoshop by combining 3 separate sets photographs:

Haunted House, Tree and Moon

I've printed the picture of haunted house and tree from Internet and had their outline cut-out accordingly. I'd also drawn and cut the shape of the round crescent moon. The haunted house, tree and crescent moon were placed on the soft box with orange gel to produce the silhouette against an orange crescent moon effect.

Grave, Pumpkin, Ghost, Flying Witch and Bats

They are those glow-in-the-dark stencils that I had bought during my last visit to River Safari a week ago. I had put them under the light to produce the glow before photographing them using long exposure in a dark room. Some of them were converted to black and white using photoshop.

The Five Skeletons

They are 3D skeleton models bought from NTUC. Likewise, they were photograph using long exposure in a dark room.


Happy Halloween and have Lots of Spooky Surprises!!!


Read more
30 Oct 2013
Lotus and Flowers @ Bay East Garden

This morning I returned to Bay East Garden - 2 weeks back, I came here in the wee hours for the night cityscape of Singapore and did not have a chance to look around the park since it was dark. I only managed to cover a third of the huge park before it started to rain heavily.

Lotus Pond

The moment I entered from the visitor's center, I cannot help noticing a huge pond that is full of lotus. Not many parks in Singapore have lotus ponds - most have water lilies that may be mistaken by many as lotus. Lotus have a unique lotus seed pod that grows inside the flower, after which the flower withers leaving only that lotus seed pod behind.

Lotus not only has important symbolic meaning in Buddhism (i.e. purity), but lotus seed in Chinese culture also carries the meaning of "many descendants to come".

Looking closely into the lotus ponds, I could also find lots of water spiders and other insects.

Beautiful Flowers and Plants

I love photographing colorful blooming flowers. If you are just like me, then this is the right place to come. Besides lotus, there are many different types of flowers and plants.

Some Tips on Close-Up Photography of Flowers

  • If you are using macro lenses to photograph flowers, then you should avoid using too wide aperture as the depth of field (DOF) would be so shallow if shooting the flower at close proximity, which will ruin the shot i.e. the focus area of the flower would be very sharp and the rest would be blurred. For example, the DOF would only be around 0.1cm shooting at F/2.8 using 100mm focal length at a distance of 30cm away from the flower! Using lenses with a shorter focal length with a smaller aperture (i.e. bigger F number) and standing further away from the flower would help to increase the DOF.
  • Alternatively, using a long telephoto lens to zoom into a particular flower from a distance using a wide aperture could throw the foreground and background into out-of-focus so that you can draw your viewer's attention to the flower in the picture.
  • If using auto-focus in close-up photography, the auto-focused point could be thrown off easily with slight movement that is caused either by your hand or the wind. Hence switching to manual focusing could be a better option.
  • Don't be shy to use a tripod especially when using macro lenses as the slightest movement could result in the picture to be out-of-focus. The help of remote shutter release would also help to minimize potential shakes on the camera.
  • If you do not have a tripod, then try to maintain shutter speed that is equivalent or faster than the inverse value of the focal length of your lens used to minimize potential out-of-focus problems caused by slight camera movement. For example, shutter speed of 1/100s or faster should be used if using a lens with focal length of 100mm.
  • Sometimes lighting condition may not be ideal, as such using reflectors could help to brighten up the scene. Simply have a white piece of cardboard or towel to redirect/bounce the available light from other sources onto your subject. 
  • The wind can always ruin your picture and definitely frustrating. Unless you can move the entire plant indoor, otherwise just have to be patience and wait for the wind to subside. We cannot fight nature right :)

Butterflies, Bees and Other Insects

There are definitely a lot of beautiful butterflies and bees (and wasps) flying around the flowers. Photographing them is definitely not going to be easy as they are hardly still, and would fly away whenever you try to approach them - just gotta be patience and wait for your chance.

Dragon Boat at Kallang River

As I was photographing around the lotus ponds, I heard cheers and shouts at the Kallang River next to the park and pop by to take a look. To my surprise, there were students (I guess) practicing dragon boats. Quite fun to watch them rocking their dragon boats and rowing away.

Day View of Singapore Cityscape

Of course, not to mention the Singapore cityscape view that you can photograph.

Please visit http://jefzlim.smugmug.com/Destinations/Singapore/Bay-East-Garden for more photos ...


Read more
29 Oct 2013
Smoke Gets In Your Eyes

Today I spend the entire rainy afternoon in my little studio playing with smoke. I had my room filled with smell of smoke but it was great fun.
(Picture Above: Do you see a man with arms stretching out to both sides?)

Smoke photography is one of those really fun subject because every photographs produces different pictures. Depending on the shape and form of the smoke (and of course your creativity), it can be superimposed onto another object to give it a creative appeal e.g. smoke from a kettle or tea cup.

Here are some tips on how to take pictures of smoke …

Logistics/Equipment Required

Dark Room with Still Air

To effectively capture the smoke, the room needs to be dark enough and without any moving air (i.e. turn off the fan or air-condition). I find results more pleasing if the room is completely dark i.e. can barely see own hand. If you are working in a very dark room, make sure you have a touch light or can easily access to the light switch just in case anything is toppled over.

Black Background

Either a piece of black cloth or black paper/cardboard that is enough the cover the frame of picture is required as the background so that the smoke taken can "stand out".

Remote Trigger

If you are doing this alone, you will definitely need a remote trigger as you will be fanning the smoke or creating "patterns" of the smoke which I will explain later.

Off-Camera Flash

In my case, I've used my Canon 580 EX II as the off-camera flash controlled from my camera via ST-E2 transmitter. The off-camera flash is placed at 45-degree position on either the left or right, facing towards the camera. Placing at this position will help to illuminate the smoke with a completely black background. Do a couple of test shot to ensure that:
  • The flash does not illuminate the black background. If it does, move it further away from the background (or move your background further back). Alternatively, put a black cardboard between the flash and the background to block the light.
  • The smoke can be illuminated from the firing flash.
  • The firing flash does not point into the camera i.e. the flash fired should be outside the camera's angle of view.

Tripod (Self-Explanatory)

Self-explantory especially shooting in the dark and alone.

Smoke Source

A burning incense is ideal because it is safe and produces a steady flow and nice form of smoke. Furthermore, it can be stick onto a sponge or styrofoam without the need to hold onto it.

If you don't have incense stick, you can try make a "smoke stick" with kitchen paper towel. To make a smoke stick. twist a piece of kitchen paper towel into a stick (see picture below). You have to make sure that it is tightly twisted, otherwise it will just catch fire easily. To produce smoke, fan off the fire once the stick is already burning. Please be careful not to burn down your house if you are using kitchen paper towel as it is more flammable and harder to control. Do note that the kitchen paper towel stick can be quite smokey :)
(Picture Above: Kitchen paper towel stick on top left.)

Camera Settings

Pre-Focusing Required

Before switching off the lights, you will need to pre-focus on the spot where the smoke will be rising into the air. You can do so by auto-focusing on the tips of the incense stick, once that is done, switch to manual focus.

ISO 100, Small Aperture (F/13 or Higher), 1/200s Shutter Speed

This is the typical settings that I start off with. If you are not getting the right exposure, you can try a wider aperture but not recommended to be wider than F/8.

Flash Power Output

The flash power should be adjusted accordingly to a suitable level that will illuminate the smoke sufficiently. You should play around with the flash power output alongside the aperture used. In my case, I've used between flash power of 1/4 to 1/8.

Take Picture in RAW

Taking the smoke pictures in RAW allows you better control during post-processing which is definitely required for any smoke photography.

Creating Interesting Smoke Form

If you leave the incense stick burning without doing anything, you will only get a straight stream of smoke. So to give a little bit of excitement to get more interesting smoke form, you can try to:
  • Gently fan or blow the smoke
  • Use a container (e.g. a plate, a cup) to temporarily catch/hold the smoke as it raises and releasing them (by moving the container gentle away) after a while.
You can also add color gels to your flash to produce other interesting colors of the smoke.
(Picture Above: Do you see a face flying to the left?)

Post-Processing

The key adjustments using your preferred image editing tools should be on the contrast, exposure, hue, saturation, temperature and tint of the smoke picture taken. Contrast and exposure take care of the intensity and tone of the picture. Hue, saturation, temperature and tint can control the colors on the smoke.

If you want your smoke picture to appear on a white background instead, just invert the picture colors. You should do this before you start applying any adjustments as the look and feel can be very different on a white versus a black background.

Where required, you should clean away any unsightly/unwanted smoke in the background for a better picture composition.
(Picture Above: What do you see now?)

Have Fun Trying Out Your Own Smoke Photography!


Please visit http://jefzlim.smugmug.com/Studio-Works/Smoke for more photos …


Read more
28 Oct 2013
Water Ski @ East Coast Park

This afternoon, I went to East Coast Lagoon Food Village for lunch which was unfortunately closed for renovation. I ended up spending time at the Cable Ski-Park (Ski 360 degree) at East Coast Parking taking photographs of water ski sports.
It was quite fun watching them ski, making stuns and fall into the water (for some). The splashes on the water and freezing the skier in the air when they made stuns, make great sports photography pictures.

The following are some pointers on how to capture and freeze the skier in action …

Stay Near the Starting Point

I've been here several times, and I always noticed that these skiers typically carry out their stuns on their return journey near the starting point. I guess the reason is because they do not need to walk so far back to starting point if they were to fall into the water.

Use Telephoto Lenses

If you want a clean close-up picture of the skier which is probably 30-80m away from you, a long telephoto lens is required. Today, I wasn't expecting to take water ski sports and thus did not have my long telephoto lens with me. After cropping the pictures for a closer-up view that was taken with my standard zoom lens (24-105mm), I can still still get decent pictures with a reasonable resolution.

Use Fast Shutter Speed

Shutter speed is key - In order to freeze the action of the skier and the water splashes made, a shutter speed of at least 1/320s is required (go higher if you can). Under bright sunlight, this should be very easy to achieve. However on a gloomy day (which I've tried before), you may need to step-up the ISO in order to achieve the desired shutter speed.

Continuous Focusing (AI Servo) Mode

Turn on the continuous focusing mode on your camera and start tracking the skier's head from afar when he is approaching. Stay alert and be ready to click your shutter when he does the stun.

Continuous Drive/Shooting Mode

Not every time you will get to see an expert water skier performing stuns such as 360-degree turn in the air. So if you spotted one, it may be good to switch to continuous shooting mode so that you can capture a whole series of the skier's action as he flips in the air.

While watching the water ski, I spotted 2 cranes that were hanging around me. Believe it or not, I spent half an hour chasing after them for photographs until I realize my stomach is groaning and it was already 2.30pm :)

Please visit http://jefzlim.smugmug.com/Destinations/Singapore/East-Coast-Park for more photos …


Read more
27 Oct 2013
Light Painting Photography: Writing with Laser Pointer

While I was clearing a box "useful" junk in my room. I found my old laser pointer. It was more like a laser gun as the green laser beam emitted is so strong and powerful that the beam can be seen on the wall of a flat that is 100m away.

As I sat down at my sofa playing with it, the idea of light painting photography struck me. Quoted from lightpaintingphotography.com … "light painting photography is a photographic technique where the artist opens the shutter of a camera for an extended period of time and uses various light sources to create color and design with in the frame...".

Although I am  not an artist that can paint well, I am keen to explore the different types of light painting techniques. With only a laser pointer on hand, I wanted to start off with something basic and simple - writing and drawing with laser pointer.

Easy and Simple Setup for Light Painting

No extensive setup or flash required is the beauty of light painting photography. The following are basic setup required for any types of light painting photography.
  • A dark location - If experimenting at home, you will require a dark room that is without any source of direct and indirect light (e.g. ceiling light, table lamp, monitor light, etc.) that could be affecting what you are painting - the darker the room the better. If experimenting it outdoor, then the location must be dark enough - street lights, lights from car headlight, etc. should be avoided.
  • Tripod - As long exposure will be used, a tripod is definitely needed so that you do not end up with a bad picture due to shakes.
  • Various Sources and Types of Lights - These are the "paint" that you will be painting with, e.g. laser pointers, torch lights, light sticks, sparkles, etc.
In this particular exercise that I'm doing, I am using my laser pointer as the only source of light. I also had a black background, which is the "blackboard" that I will be writing and drawing on.

Camera Settings

Small Aperture with Long Exposure Time

In light painting photography, a small aperture is typically used as it allows lesser amount of light to pass through, which will help to create a dramatic light effect as the subject is painted with light when exposed over a period of time. The amount of exposure time varies depending on how the subject is painted.

Pre-Focus Beforehand

As the shot is taken in the dark under long exposure time, a pre-focus on the subject is required. At home, simply do an auto-focus on subject using the room's ceiling light or table lamp, and switching it to manual focus once is pre-focus is done (note: remember to switch off light in the room before taking pictures.) If outside, use a torch light to shine on the subject so as to allow pre-focusing to be done.

My Results of Writing Using Laser Pointers

I wanted to create a set of handwritten A-to-Z using the laser pointer on the blackboard. 

Initially, I set my camera to bulb mode to capture my writing, however I find that it is really difficult to align the written characters properly if I do so. Furthermore, I cannot gauge the edge of the camera's frame in the dark which makes writing really difficult.

So I ended up taking taking a set of 26 alphabet photos, each with an exposure time of 3-seconds (just sufficient time for me to finish writing a character). After which, I combine all the alphabets together into a simple picture. As you see from the alphabets written above, it is actually not that easy to write neatly using a laser pointer!

I look forward to try out the other types of light painting techniques and share is with everyone when I've done so.


Read more
26 Oct 2013
River Safari (Part 2): Rivers of the World

Apart from the pandas as shared in yesterday's post, there are other areas of attractions which cover the key rivers of the world such as Mississippi River, Congo River, River Nile, Ganges River, Mekong River, Yangtze River and the Wild Amazon.

A tour around the River Safari would take around 2-3 hours, considering the need to spend 10mins at every attraction point to take photographs. You will get to see many information and insights into the types of wildlife and marine life that lives along the river.

Wild Amazon

As a photographer, the Wild Amazon attracted me most (besides the Giant Panda Forest). Although the Amazon River Quest boat ride will only be available until later this year, there are still several interesting stuff for photography …

Live Feeding of Fishes

It was exciting to see big fishes (cannot remember the name of the fish) jumping off the ponds for the bait/food in the air i.e. how the fish body twist in the air, the bite on the bait/food and the splashes it create. A shutter speed of at least 1/500s is required to freeze them in the air if you want a sharp picture. Using a wider aperture and higher ISO without a flash would help to achieve the required shutter speed.

Squirrel Monkeys

They are held inside an open-air enclosure which you can enter. Although there is a stench inside the enclosure, it is worth entering as these squirrel monkeys are totally not shy to human and they can get really close like less than 1m. They hardly kept till which means that you will need to turn on continuous focusing mode (AI Servo) in order to track and photograph them. The nature light should be bright enough for the right shutter speed going on an Aperture Priority (AP) mode.

Amazon Flood Forest

There is a big fish tank which shows how the amazon forest is flooded at certain part of the year. The big fish tank is somewhat similar to that seen in S.E.A. Aquarium but of a smaller scale.

Although there are nice sea cows in the big fish tank, the thick fish tank glass and poor lighting condition inside here is really unfavorable for photography. Besides from the need to bump up the ISO as high as I can get and need to switch to manual focusing, there is also a risk of chromatic aberration occurring in the picture taken (e.g. purple fringes around the sea cow picture below).

The Other Rivers

Frankly speaking, the attractions did not fulfill my photography appetite because most of the wild life and marine life are kept in tanks which has poor lightning condition. In addition, the reflection of the glasses caused by the sunlight behind me, makes focusing and picture composition difficult.

With reflection falling on the fish tanks, auto focusing would be difficult. Switching to manual focusing would help. All other tips relating to photographing fishes in tanks in my earlier post can be observed and applied here as well.

Other Subjects for Photography

Shadows from Landscape

Walking along the River Safari, I find that there are interesting shadows from the buildings and bridges on the Upper Seletar Reservoir which makes good photography subjects.

Flowers and Plants

There are also some interesting flowers and plants along the way that can be photographed.

Please visit http://jefzlim.smugmug.com/Destinations/Singapore/River-Safari for more photos ...


Read more
25 Oct 2013
River Safari (Part 1): Lunch Date with Pandas

Today, I visited the River Safari with the key intent to see the 2 pandas - Kai Kai & Jia Jia, China's gift to Singapore. (Updated on 26-Oct-2013: The pandas are actually on a 10 years loan from China.)
The pandas are located in the Giant Panda Forest right in the middle of the River Safari. It was past 11am by the time I reach the Giant Panda Forest which is located right in the middle of the River Safari. The Giant Panda Forest is a huge enclosure special air-conditioned climate specially designed for the pandas. The place is also quite bright which makes photographing the pandas easy (but remember no flash allowed). 

At the entrance of the Giant Panda Forest, there were the Red Panda - which look more like a cross-breed between fox and raccoon to me. They are very lively which keep walking around in the tree, and most importantly they can get very close to you (about 2-3m) which makes it great for close-up shot.

Kai Kai & Jia Jia is located after the Red Panda section. I was a little disappointed to see only the male panda (Kai Kai) which was sleeping away, and the female one has gone into hiding. So I ended up taking a few picture of the sleeping model after waiting for 20mins just hoping to see them in action.

With a disappointed heart, I break for lunch at the Mama Panda Kitchen and ordered a set meal with an additional "Panda bun" - since I can't see them in action, I will eat them :)

It was 1.15pm after lunch and I decided to go back and take one last look at the panda. To my surprise, the working staffs are laying out the bamboos and preparing the pandas' lunch! Finally, both pandas came out for their lunch and I can finally photograph them in action. They are cute and I took a bunch of 50 odds photographs of them.

So for anyone going to River Safari to photograph pandas (Jia Jia & Kia Kia), you may want to note the following:
  • The pandas are kept is separate enclosure. If you want to photograph both of them, then you have to run between the enclosures.
  • The feeding time appears to be around 1.30pm. You don't have to rush to take photographs, as they will be there for at least an hour to finish their "bamboo lunch".
  • The pandas will probably be within 5-10m distance away from you (depending on where you stand), which means that a standard telephoto lens of 100mm-200mm can get you a good close-up of the pandas.
  • You will be taking photographs of them from a slightly higher ground on the bridge, which will be crowded with people as time past. The view of pandas are blocked at some parts of the bridge which means that you have to "fight" for a good position before the crowd comes.
  • Although no flash is allowed, lighting condition within the enclosure is quite alright with the natural light coming in from the glass roof-top. So going with ISO-400 and aperture of f/4 or f/5.6 should give sufficient shutter speed for a sharp image and depth of field (DOF).
  • Last but not least, I noticed that fog condenses on the glass surface of my lenses when I stepped out of the Giant Panda Forest into the open-air. This is normal due to the differences in the temperature, so don't jump when that happens. Just give it a little bit of time for the fog to vaporize. If you have lens hood on the lenses, removing it will help.

The pandas are so cute - go take a look :)


Please visit http://jefzlim.smugmug.com/Destinations/Singapore/River-Safari for more photos of the pandas that I took …


Read more
24 Oct 2013
Tutorial to Create Fake Miniature Effect

Today, I was doing housekeeping of my photography website and I stumbled upon some old miniature photographs that I had learnt to create years back. So I scrambled through my old notes, and going to share the tutorial to create miniature effect with everyone.
Real miniature pictures can be taken through tilt-shift lenses that allow both the foreground and background to be blurred based the angle on the plane of focus. If you do not have a tilt-shift lenses just like me, the miniature can still be created using photoshop techniques during post-processing.

What Types of Photograph Is Suitable for Miniature Effect?

All photographs can be turned into a miniature effect, but not all types of photographs are suitable. Typically I find that a picture of a busy street with peoples, buildings or objects makes nice looking miniature. The picture also has to be taken from a distance and an elevated angle, for the miniature effect to be stronger.

Tutorial: Step-by-Step Instruction Using Photoshop

Miniatures photographs exhibit two key characteristics: (1) strong Depth of Field (DOF) with a blurred foreground and background, and (2) strong saturation of colors. This is exactly the 2 keys steps that will need to be applied to the picture using photoshop.

In this tutorial, I will use an old photograph that is taken from Marina Bay Sands. Please note that the instruction is based on my Adobe Photoshop CS4 version. If you have newer versions, the functionalities and techniques is the same.

Step 1: Create a duplicated copy of the photograph

Once the photograph, a duplicate copy of the photograph needs to be created. Easily done through menu bar: Layer -> Duplicate Layer. Give your layer a name (e.g. "Blur Layer").

Step 2: Create a Layer Mask on the Duplicated Layer

With the duplicated layer selected in the Layer Panel, go to menu bar: Layer -> Layer Mask -> Reveal All. Alternatively, you can click on the Layer Mask icon in the Layer Panel to do so (as shown on the right).

Step 3: Create a Reflected Gradient on the Layer Mask

Select the created layer mask from the layer panel.

With the layer mask selected, select the gradient mask tool and set it to "Reflected Gradient" with a black gradient foreground and white gradient background as shown below.


Next, draw a straight vertical gradient on your photo on the area where you want to have the "miniature" effect to be in focus. In my case, I wanted the porch in front of the Esplanade (with people around) and part of the Esplanade to be "in focus".

(Note: The gradient mask can be adjusted at any point of time later by just going through Step 3.)

Step 4: Create a Gaussian Blur on the Image

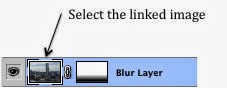
Now, from the Layer Panel, select the linked image that is next to the layer mask where you have created the gradient.
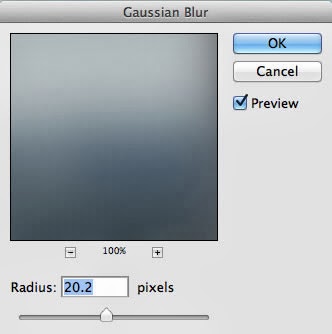
Once the linked image is selected, select Gaussian Blur filter from the menu bar: Filter -> Blur -> Gaussian Blur

A Gaussian Blur dialogue box will be shown. Adjust the radius to an appropriate level where the foreground and background is blurred.

As the radius is adjusted, you should be able to see the effect on the image in your screen with the "Preview" turned on.

(Note: I typically work within 15-20 radius. Still it is case-to-case depending on your photograph.)

Step 5: Final Step to Add Strong Saturation to the Image

Now that the gaussian blur has been applied, a new Hue/Saturation adjustment layer needs to be added. From the menu bar: Layer -> New Adjustment Layer -> Hue/Saturation. Once that is done, the adjust panel would up. Simply adjust the slider for the saturation to the right.

The final miniature effect would look something like the picture below. Try create your own miniature effect and have fun!

Please visit http://jefzlim.smugmug.com/Themes/Miniature for more photos ...


Read more
23 Oct 2013
Exploring Sungei Buloh Wetland Reserve

Beside birds photograph at Sungei Buloh Wetland Reserve (covered in my post yesterday), there are also many other interesting subjects. Each time I go there, I spot new things to photograph.

Close Encounter with Four-Legged Lizards

Four-legged lizards are perhaps the easiest and most common to be spotted among the mangrove forest and along the walkway due to their sizes which can be more than 1m long. The big ones does not seem to be afraid of human as I can get as close as 2 feets from them. In most cases, they would run away when I make too much noise or get too close. Anyway, precaution should still be taken although they appear to be "friendly" - I don't know if they will attack and bite :) I was also lucky to spot a baby four-legged lizard which is only less 10cm long.

Fast Moving Squirrels

There are a lot of squirrels around, and you know it when you hear tree branches snapping sound. Squirrels move very fast among the trees which makes it hard to track them with the camera. The low light condition also makes it difficult for a shutter speed fast enough to freeze their movement for a sharp picture. They are also quick to escape your view with the slightest sound made. 

Observing and anticipating their movement, along with a higher ISO and large aperture would help in getting a shutter speed fast enough to get a good sharp picture of them.

Hard to Spot Insects?

Definitely in a mangrove forest, there are definitely lots of insects - ants, beetles, snails, grasshoppers, spiders and some insects that I never even see it before. Although there are many insects, I think it is very hard to "search" for them. I did not purposely hunt for them - I only photograph them only if I stumbled upon them by chance.

Dragonflies

Dragonflies can also be spotted at the freshwater pond area within the reserve. If you are interested in photographing dragonflies, you can refer to some of my tips given in my previous article on Punggol Promenade Riverside Walk.

Wetland Plants and Mangrove

Mangrove with their roots sticking out of the mud/water can make nice photography subject. 

If you think that plants in the reserve looks "all the same" and nothing interesting to photograph, then you could be wrong. Try look out for plants that have interesting patterns such as spirals which will make good pictures.

Mangrove Habitat

There are wooden bridges that cuts across the mangrove area which will allow you to spot and photograph interesting living organism (e.g. crabs, shellfish, etc.) commonly found living or growing in mangrove area. 

The picture of a huge mudskipper which I spotted by observing the mud swamp.

Important Things to Note

  • Get hold of the wetland reserve map at the visitor centre (or download it online beforehand). The map indicates the location of the resting stations/huts for shelter which could be useful if caught in sudden rain. The map will also come in handy if you are lost.
  • Make sure you are medical fit enough to "survive" the walk in the wetland reserve. It is more than 10km to explore all the available routes. You could get exhausted fast if you are going to carry lots of photography equipment.
  • Decide what photography equipment to bring as they will add on to the weight. The variety of photography subject requires lens with a wide range focal length (i.e. from macro to wide angle to super telephoto). 
  • Avoid venturing into the wetland reserve during rainy weather or thunderstorms. Always check weather forecast before deciding to go to a wetland reserve. You will be surrounded by tress and definitely do not wish to get struck by lightning.
  • Singapore weather is very humid and you can get dehydrated from the walk, especially carrying additional weights from your camera equipment.
  • While it is good to get closer to your subjects when photographing them, you also have to be careful not to fall into mangrove swamps. Safety comes first.
  • Insect repellents! I was bitten by tons of mosquitoes (really a lot)... These mosquitoes are one of a kind - they continue to stick on my skin even when I try to wave them off. I had to smack and kill them.


Read more